Objectives: The purpose of this study is to evaluate the accuracy of 3D printed burnout resin, CAD/CAM milled wax and CAD/CAM PMMA and the effect on die spacing and cementation onto the tooth.
Method: Design and manufactured three different type of digital materials, PMMA, milled wax and 3D printed burnout resin (n=4/product). PMMA and milled wax were milled by MC X5 CAD/CAM machine and 3D printed resin was produced by Asiga Max. Scanning the crowns sprayed by Shera scan spray using INEOS extraoral scanner to create STL files exported for comparison with master crown. We invest (90% to 10% Shera to distal water ratio) using Shera Fina 2000 investment material and cast with Sirona PFM dental cast alloy. Devasting and grinding out the excess alloy around the crown with a 3.3 bar pressure sandblasting. Repeating the scanning processes with casted crowns and compare the STL files in cloud-compare software. Using Auto Mesh to cut half the crown to make the result accurate. Comparing both before and after casting crown in STL files using cloud-compare software and get absolute mean and RMS value for each crown. The data points on each crown is already large enough, so we don’t use p value in our study.
Results: CAD/CAM milled wax, PMMA and 3D printed burnout resin all found some of the abs mean and RMS value increase before and after casting compared to master crown. Milled wax has the least difference followed by 3D printing and PMMA. PMMA is the least accurate material in this experiment which would vary the amount of die spacer and cementation.
Significance: High inaccuracies of PMMA material might affect the actual die spacing and cementation value, whereas milled wax performed the best. Milled wax and 3D printed resin are both within the clinical acceptable value.
Keywords: CAD/CAM, 3D printing, Die spacing, Cementation, Internal fit
Fixed dental restoration aimed to restore patient’s function and aesthetic. By having a comfortable fitting, the crown should have a good retention and resistance, correct cementation system and a certain thickness die spacer.
In prosthodontics, using conventional method to produce dental restorations has been considered as a gold standard technique for several decades.1 Nowadays, majority of labs still use traditional method (gypsum die) to produce a dental crown. Gypsum dies have been used for decades. Although it is most reliable, still the gypsum is in brittle nature and easy to crack, especially around the tooth incisal area during impression pouring. This along with the model should be combined with other mechanical property such as die hardener to strengthen the property around the coping area.
The conventional method uses an impression which contracts and expands to the bite tray. Polymer dental materials have been used to reproduce hard and soft tissue inside the mouth. Polyether, addition and condensation silicones are the three types of impression material used in conventional method.2 Drundke, et al. has reported that polyether has the best wettability which is twice higher than silicones and higher surface tension. Surface tension in silicones has found no difference. Overall, polyether is an accurate impression material and followed by silicones. However, the way the impression material stored is how this will affect the die by either shrinking or enlarging the die. Type IV gypsum die stone is typically used to pour the impression. A study has shown that Type IV gypsum die stone has a setting expansion below 0.1% and the highest surface hardness.3 By using this type of die stone, it helps to keep the impression faithful and accurate for the crown to fit on. With traditional dies, die spacer will be used on die hardener to simulate the film thickness of cementation. A study has shown that die spacer should be placed less on occlusal line than other surface and different brands of die spacer form the same thickness layer.4 This allows the impression to be made with dimensional accommodation with dental cement, which minimizes the problem with contraction.
The traditional, old trend of creating gypsum model for morphology has been replaced by digital intraoral scanning in more labs. The scans can be sent straight to technicians to design instead of needing to wait for a physical model. The design is exported with a restoration design using CEREC3 in lab software. The first fit is when the patient is seen again and the fit must be clinical acceptable, which this method is faster and more reliable than the traditional method.
The restoration will then be produced by using 3D printing or CAD/CAM milling machine using specific type of material. Despite all the new technology, die spacer is still needed and cement is used to insert the prep.
Our research has been much more than necessary as the fast development in 3D printing and CAD/CAM milling digital technology. They have become a common place in dental laboratory. When dentists prepare prep for the patient, correct taper angle will give adequate retention and resistance. A study has found that in a convergence taper angle of 5° gives maximum retention.5 This creates laterally retentive preparations. However, the taper angle must be 100% accurate, otherwise they may not be enough space for cement. Proper bonding between restoration and prep won’t occur as this may affect the whole function. Dodge et al. has found that resistance form is more sensitive to taper angle changes than retention form.6
3D printing is a digital technology becomes popular in recent years. More and more dental labs and small companies use 3D printing because the good strength and faster manufacturing time. 3D printing brings two fundamental innovations: the manipulation of objects in their digital format and the manufacturing of new shape in addition of materials (digital + additional technique). This brings a physical object from a three- dimensional digital model.
CAD/ CAM technology came out in early 1970s. It uses subtractive manufacturing process from a milling block to the designed shaped crown. The milling machine which is controlled by the computer to remove excessive material producing the products.
When finding supporting and related research, we have noticed that there are discrepancies in accuracy between 3D printing and CAD/CAM machines within multiple studies. Many years in between different studies, discrepancies are unavoidable and although issues are expected, new studies are now needed to fill in the gap for modern digital technology. A constant introduction of new type or “better” series of machine create regular gap in literature studies as well, so frequent research is necessary.
With findings from previous literature studies, 3D printing addictive method is more accurate than CAD/CAM subtractive method. The previous result has led us to hypotheses Asiga max 3D resin coping would be more accurate than the two MC X5 CAD/CAM resins that we tested.
The aim of the present study is to evaluate the accuracy between three digital materials (PMMA, milled wax and 3D burnout resin) if they can faithfully keep designed digitally. The design of restoration must facilitate to cement onto the master die for fitting. Our research will indicate PMMA, milled wax and 3D printed burnout resin whether they need more or less spacing compared to each other. The relationship our research determine is between the cement space and different materials’ ability to keep desired space for cement to give desired bonding capability.

A master die and a coping are prepared using 3D printing technique as reference which we ensured they had adequate retention with cement space. Same digital design was used to print is as PMMA, wax and 3D resin material. We would scan them both before being fabricated and after cast. Therefore, we can determine which digital material is the most accurate to clinically acceptable master die.
For our experiment, we prepared a master die which had similar dimension to the real upper second molar tooth prep. A master crown was designed according to the measurements. Our crown is designed with a flat surface and with no taper angle as we are only focusing on the accuracy of the internal fit and the cementation system. We used one-way ANOVA to calculate the sample size using G-power software, which results in 4 sample each for each material to have a reliable result.
Asiga DentalCast was the resin we used which is manufactured for 3D printing and Dentsply Sirona PMMA disc and Dentsply Sirona Wax disc were used for CAD/CAM milling (Figure 1).
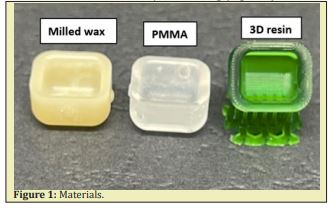
Four crowns from each material would be fabricated using master die as reference. These crowns would be scanned using extraoral scanner and Shera scan spray was applied to brighten the internal surface of the crown which results in a more accurate and clearer scan to capture the image. We ensure the distance to spray each crown to stay constant by the same person.
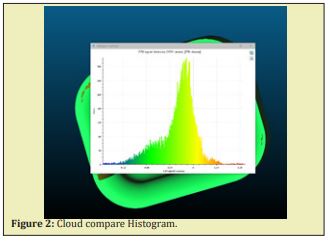
We scan the crown to create the digital image and exported in STL file which will allow us to compare each image with the master design using cloud-compare software. Cloud-compare is a 3D point cloud (and triangular mesh) processing software. It has been originally designed to perform comparison between two dense 3D points clouds or between a point cloud and a triangular mesh. In our study, which is the master crown scan and the sample crown scan. The results would all shown in histogram graph. When operating the software, the master crown design would be set as a reference and each scan of the sample crown would be compared to the master crown. We would then rotate each scan into the same orientation and the software can match the two crowns together into one for the overlapping point clouds. Cloud-compare software would then form a histogram to present the result of comparison in between the difference of reference and the compared crown. We repeated the same process until all the crowns are being scanned and compared. However, only half section of the crown would be used to compare and sectioned by using AutoMesh Mixer. We eliminate another half section of the crown which is sticking inside the blue tack during extraoral scanning. We ensure there was still enough data points to scan on half a crown.
The histogram generated from the cloud-compare software showed the frequency distribution of the data points and provided the value and results for us to calculate the absolute mean and RMS value (Figure 2).
Absolute mean is calculated using the following equation:
RMS value is calculated by
After scanning all the crowns before casting, Sirona PFM cobalt chrome alloy would be used for casting, Shera Fina 2000 investment material and Shera (expansion liquid) with distill water would be used for investment. The sprue we used was 3.5mm in diameter. We control the investment of crown under condition of 23 degrees Celsius with 40% humidity inside the lab. We invested following the manufacturing menu, which we used 60 grams of investment material and 14ml liquid in total for each crown investment. For the liquid using for cobalt chrome alloy, 90% to 10% Shera to distill ratio was recommended inside the menu. So, we used 12.6ml of Shera and 1.4ml of distill water for each of our investment.
When all the rings are set under 20 minutes, they would be placed into the same furnace and undergo a fast burnout process with the highest temperature of 850 degrees Celsius and a 20 degree increase per minute from the room temperature. The rings would be cast after 3 hours of fully melting wax inside the furnace and would be cooled down the room temperature for devasting. The crowns were sandblasted using the same sandblaster machine with a set of 3.3 bar pressure (Figure 3).
The sprues were cut using Renfert cutting disc, after casting crowns would then be scanned and compare by the same method as the crown before casting creating histogram for the results.

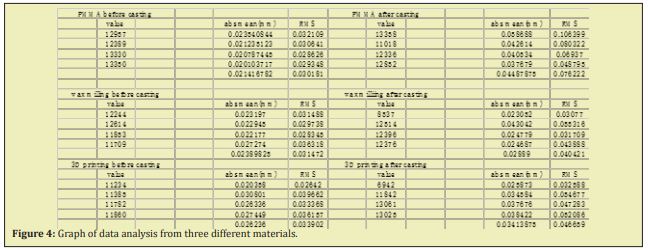
As the above graph shows, this is all the data analysis (absolute mean and RMS error) from three different materials before and after casting performed using cloud-compare software. Absolute mean and RMS error gives a range of the point difference compared to the master die (Figure 4).
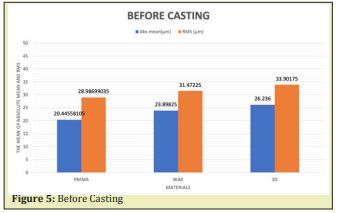
This bar graph showed the absolute mean and RMS values before casting in PMMA, milled wax and 3D printed resin. We found that absolute mean for PMMA to be 20.44 microns and RMS to be 28.98 microns. Milled wax has a wider range of 23.89 microns for absolute mean and 31.47 microns for RMS value. Followed by 3D printing has absolute mean of 26.23 microns and RMS value of 33.90 microns (Figure 5).
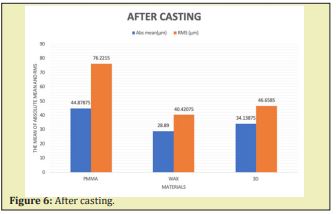
The graph showed the abs mean and RMS value of three materials after casting. We have found that PMMA material has the highest abs mean and RMS value compared to milled wax and 3D printed resin.
The difference between abs mean and RMS value in PMMA material is 31.3 microns compared to milled wax and 3D printed burnout resin which is only 11.5 microns and 12.5 microns. This indicates that PMMA contains more outliers in the cloud mesh compared to the master reference (Figure 6).
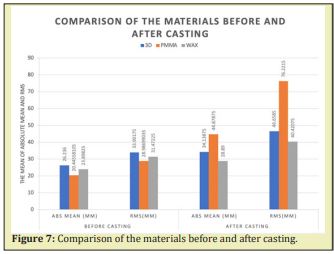
According to the results overall, milled wax which is the grey bar showed the lowest abs mean and RMS value both before and after casting followed by 3D printing and PMMA. 3D printing (blue) has the highest value before casting whereas PMMA (orange) has a significantly high value after casting. All values for 3D printing and milled wax has values lower than 50 microns, indicating to be the most acceptable value within the accuracy level with less outliers. CAD/CAM milled wax and 3D printing burnout resin are found to be more clinical acceptable than CAD/CAM PMMA (Figure 7).
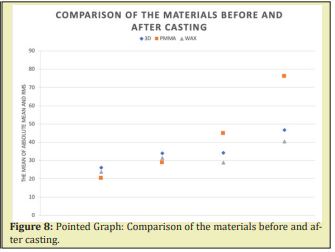
As we can tell from the pointed graph, grey points stand for milled wax and it has a slight increase before and after casting. The change is not that significant, therefore make the result more consistent. 3D printed resin (blue) has the least changes which creates a more gradual line but higher value than milled wax. PMMA (orange) shows the best result before casting, but due to the steep increase after casting, indicating the material has more changes during the investing and casting procedure, which makes it looks like less accurate compared to the others. Based on the large amount of data points measured on each crown, we assume the trend will remain the same if we were able to do more experiments in the future (Figure 8).
Based on the experiment which we had done, and the results showed from the graph. Our hypothesis was 3D printed burnout resin will have the best accuracy based on the previous literature search we have done.9,10 As 3D printing using addictive method which is more accurate than the CAD/CAM subtractive method and rounded bur when cut in specific place in CAD/CAM technique.11 Interestingly, what we found in our results CAD/CAM milling wax has the least difference before and after casting in both absolute mean and RMS value. This may be due to the new technology and development of CAD/CAM makes more accurate. Absolute mean is the overall error whereas RMS value stands for root mean square, which is more focused on the outstanding point errors in the cloud mesh. If there is a large difference between RMS and absolute mean, this means there are more outliers in comparison with master model. The RMS value squares the value to give a positive number. Both of abs mean and RMS value give the precision value of the scans. The larger the numbers, the less precise the scan was, which shows a larger scatter the value were. Our results shows PMMA material has a larger abs mean and RMS value, this means PMMA has more outliers compared to the master crown. By comparing to milled wax and 3D printed resin, PMMA is more inaccurate and may affect more on the value of die spacing and cementation onto the actual tooth.
Based on the studies we found, extraoral scanner has a higher precision value than intraoral scanner which means more accurate. In our experiment, we use more accurate machine to limit the variations inside our research as much as we can for better results.
In the present study, values were found by analyzing the points on each crown. We used cloud-compare to measure the data with each before and after casting crown compared with our reference master die. The huge data points within each crown surface gives us an accurate measurement. We have already had ten thousand more data points on each crown to measure for accuracy, so we had chosen not to include p value. The sample size in present study is already large enough for a result. All the crowns scanned by extraoral scanner will be exported into STL file and used to compare in point cloud system. A case study found point cloud system will compare large amount of imported file and comes out an accurate range of results. Points will be classified and will be converted into meshes for further comparison. Results will be based on the overlapping point and will cover all the point cloud using mesh processing software.12
The reason why we eliminate conventional method from our research is because some studies found the conventional impression material will undergo a 1 to 18 microns change vary from the temperature before pouring the model.12 Another research has found that removing the wax pattern from the die to check for margin fitness can widen the marginal gap and loosen the internal fitness because the glossy status of the wax which is hard to identify the change.13
In present study, we control using the same ratio Shera to distill water and same investment material when investing three different material crowns and using same bar pressure sandblasting machine. As we control variables in our research, CAD/CAM milled wax and PMMA has survived from the expansion and cracking from investment and casting, 3D printing has a few cracked during investment of alloy. This may cause some of the variations in 3D printed fitting surface. If we can use metal ring for investment may improve the results in our future research. Our study is valid as we control the variables we could prevent and try to present the best and accurate result for our research.
A study has found with increasing porosity inside 3D printed resin, there would be decrease in expansion of the material.14 On another side, the cracking during casting in 3D printed resin proves Asiga Max 3D printer produced high quality product with less porosity. Previous literatures state thermal decomposition starts when the temperature goes above glass transition temperature.15 3D printing may have a lower glass transition temperature than other materials which results in cracking during burnout process. Another study has also found 3D printed burnout resin will burnout readily during firing compared to PMMA and milled wax.16
Following the discussion, we should also focus some on clinical implications of our present study. By fitting the crown inside patient’s mouth, retention and resistance should be provided as they prevent the removal of the crown along the long axis of the preparation and prevents dislodgement of the crown by oblique directed forces. Two principles are important for mastication. Taper design by dentist needs to be accurate, generally 3 degrees convergence angle on each side provides perfect retention and resistance.
A certain thickness of die spacer is needed so crown can be seated onto the prepared tooth and allows enough space for cementation. No marginal gap and perfect marginal seal will occur with a good fit of crown. Clinically acceptable marginal gap has found be less than 90 to 120 microns. Traditionally, a recommended cementation are between 50- 100 microns. A study has found that the deeper position the margin, the greater amount of undetected cement area was discovered.17 Depending on the fit of the crown, seating properly with standard die spacer and cementation will restore the function for the patient.
Limitations of the present study include different type of machine have different accuracy of producing products. We used Asiga Max 3D printer for our 3D printing burnout resin. A few studies have shown that DW028D- a type of 3D printer has the stacking pitch of 10 microns, which is the lowest in brands of 3D printers. As the results shown, that type of printer forms a relatively smooth surface of the pattern and the accuracy of the fitting surface (9). For future studies, if we can use more accurate 3D printer, that could make some of the difference into the results.
Another limitation in present study as we used titanium oxide to brighten the internal surface of the crown for a better property scan into the system. The titanium oxide brought an accurate scanning but also cause increase in fitting surface thickness. On study has found that titanium particles have a widely size from 20nm to 20microns.18 But in current technology, we don’t have other ways to replace titanium oxide and no studies had found other materials. By the development in dental area, this could be prevented in some time.
Throughout this research we noticed that there were very limited studies on the comparison between 3D printed burnout resin and CAD/CAM milling wax. The lack of research has meant that there was little for us to use as a guide of reference and these materials becoming more of the status quo, we believe that more studies will be published relating to our topic to fill in the gap of literatures. With more related studies published, we will have a more certain gauge on the accuracy of these materials.
Under the limitations of present study, the following conclusion can be reached.
- CAD/CAM milled wax has the least difference between absolute mean and RMS value before and after casting, which may affect the least in die spacing and cementation onto the tooth.
- CAD/CAM milled wax was followed by 3D printed burnout resin and CAD/CAM PMMA material. The high inaccuracy of PMMA which may affect the actual die spacing of the crown.
Based on the results and experiments we had done, we cannot say if milled wax, 3D printed resin or PMMA need less or more die spacing, as the error will swing depends on the time they made on the actual side.
We acknowledge the materials and equipment support of University of Otago and would like to acknowledge the technical support from Neil, KC, Ludwig, and Wendy.
None.
Author declares that there is no conflict of interest.
- 1. Chang HS, Peng YT, Hung WL, et al. Evaluation of marginal adaptation of Co-Cr-Mo metal crowns fabricated by traditional method and computer-aided technologies. J Dent Sci. 2019;14(3):288–294.
- 2. Grundke K, Michel S, Knispel G, et al. Wettability of Silicone and Polyether Impression Materials: Characterization By Surface Tension and Contact Angle Measurements. Colloids And Surfaces A: Physicochemical And Engineering Aspects. 2008;317(1-3):598–609.
- 3. Duke P, Moore BK, Haug SP, et al. Study of the physical properties of type IV gypsum, resin-containing, and epoxy die materials. J Prosthet Dent. 2000;83(4):466–473.
- 4. Campbell SD. Comparison of conventional paint-on die spacers and those used with the all-ceramic restorations. J Prosthet Dent. 1990;63(2):151–155.
- 5. Strain KJ, Mackie J, Bonsor SJ, et al. Crown Taper Angles Achieved by Dental Students: A Systematic Review. J Dent Educ. 2018;82(11):1203–1212.
- 6. Dodge WW, Weed RM, Baez RJ, Buchanan RN. The effect of convergence angle on retention and resistance form. Quintessence Int. 1985;16(3):191–194.
- 7. 3D printer (Asiga Max, Asiga, Australia).
- 8. CAD/CAM milling machine (MC X5, Dentsply Sirona, USA).
- 9. Ishida Y, Miyasaka T. Dimensional accuracy of dental casting patterns created by 3D printers. Dent Mater J. 2016;35(2):250–256.
- 10. Mai HN, Lee KB, Lee DH. Fit of interim crowns fabricated using photopolymer-jetting 3D printing. J Prosthet Dent. 2017;118(2):208–215.
- 11. Bosch G, Ender A, Mehl A. A 3-dimensional accuracy analysis of chairside CAD/CAM milling processes. J Prosthet Dent. 2014;112(6):1425–1431.
- 12. Ng J, Ruse D, Wyatt C. A comparison of the marginal fit of crowns fabricated with digital and conventional methods. J Prosthet Dent. 2014;112(3):555–560.
- 13. Fathi Hawa M, Azal H Al-Masoody, Narjes El-Ghezawi, et al. The Accuracy of Fit of Crowns Made from Wax Patterns Produced Conventionally (Hand Formed) and Via CAD/ CAM Technology. Dennis Barber Journals. 2015.
- 14. Sun Zheng, Zhongde Shan, Tianmin Shao, et al. a multiscale modeling for predicting the thermal expansion behaviors of 3d c/sic composites considering porosity and fiber volume fraction. Ceramics International. 2021;47(6):7925–7936.
- 15. Körber S, Rainer V, Uwe G. 3d printed polymer positive models for the investment casting of extremely thin-walled single crystals. Journal of Materials Processing Technology. 2021;293:117095.
- 16. Zhao H, Paul Ki-souk Nam, Von L Richards, et al. Thermal decomposition studies of eps foam, polyurethane foam, and epoxy resin (SLA) as patterns for investment casting; analysis of hydrogen cyanide (HCN) from thermal degradation of polyurethane foam. International Journal of Metalcasting 2018;13(1):18–25.
- 17. Delgado Ruiz R, Romanos G. Potential Causes of Titanium Particle and Ion Release in Implant Dentistry: A Systematic Review. Int J Mol Sci. 2018;19(11):3585.
- 18. Linkevicius T, Vindasiute E, Puisys A, et al. The influence of the cementation margin position on the amount of undetected cement. A prospective clinical study. Clin Oral Implants Res. 2013;24(1):71–76.

